
Topic 17: Scientific Libraries#
Introduction#
In this section, we explore scientific libraries that extend Python’s core capabilities, enabling more efficient data handling, scientific analysis, and specialized functionalities.
A library is a collection of pre-written code that provides reusable functionality. Python includes the Standard Library: built-in tools and functions provided with Python itself. By using libraries, we can simplify common tasks and avoid duplicating work, enabling more efficient and focused development.
We will explore how libraries like NumPy and SciPy streamline tasks and extend Python’s versatility across diverse projects. These libraries are often faster than standard Python because they contain optimized code written in performant languages like C, C++, or Rust, which is then “wrapped” for easy use in Python.
Note
Throughout this section, we use the terms library and package somewhat interchangeably. In Python, a package is a directory containing modules, while a library is a collection of code (which may contain multiple packages) designed to perform related tasks. Both are tools that extend Python’s built-in capabilities. The distinction is not always clear-cut, and there is no strict official definition separating them, so people often use the terms loosely.
Part 1: Getting Started with NumPy#
You should already have NumPy installed from a previous topic discussing packages, so please make sure to follow the instructions there carefully (essentially, run pip install numpy in a terminal if you haven’t already or are using a different computer).
At any point, you can browse the NumPy documentation for more details. The beginner’s guide is an especially useful resource, and you are strongly encouraged to look through it in your own time!
Task 1#
Create a new Python file named numpy_intro.py.
Add the following code:
import numpy as np

data = np.array([10, 20, 30, 40, 50])
print(f"Data array: {data}")
Run the script and confirm the output shows the NumPy array.
Analysis#
Import
numpy: We first import thenumpylibrary as a package, and give it an aliasnpfor brevityCreate a NumPy
array: One of the main features of NumPy is it’s powerful array system, which we can use to store large amounts of data and manipulate it with ease.In this example, we have created a simple 1-dimensional (1D) array containing the numbers
[10, 20, 30, 40, 50]and stored it in the objectdata.Essentially, we have created a single row of data.
Printing our output: Finally, we can see the output of our little program shows the array has been succesfully created and re-outputted in the format NumPy has chosen.
Task 2#
To your
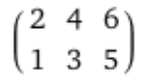
numpy_intro.pyfile, add the following code:# Create a 2D array arr_2d = np.array([[2, 4, 6], [1, 3, 5]]) # Output some information about our 2D array print(f"2D array shape: {arr_2d.shape}") print(f"Sum of all elements: {np.sum(arr_2d)}") print(f"Mean of all elements: {np.mean(arr_2d)}")
Run the new file and see if you could have predicted the output.
Analysis#
This example demonstrates how to begin to handle multi-dimensional data.
Creating a 2D array: We have first created a new array with two rows, given by the lists
[2, 4, 6]and[1, 3, 5], by giving thenp.array()function a list of these lists.What we have essentially given NumPy is the following:
Getting array information: The NumPy array object has many useful features built in, some of which are shown in this example
NumPy arrays have a number of useful properties, such as
.shapeseen here, which gives a tuple with the number of rows and columns in the array. Since we have 2 rows and 3 columns, it returns(2, 3).Next we use the functions
np.sum()andnp.mean()to determine the sum and mean of all the elements in the 2D array we used as the argument.
Remember that if you are using an IDE like VS Code, you can hover your mouse over NumPy functions and properties and receive their docstrings back!
Task 3#
Import csv and find some useful information like mean and standard deviation of a dataset.
Make sure you have the
test_data.txtfile in your topic folder.Create a new file called
numpy_data.pyand paste the following:import os import numpy as np # Determine the directory where the script is located script_path = os.path.abspath(__file__) script_dir = os.path.dirname(script_path) # Construct the full path to the data file which is in the same folder as the script data_path = os.path.join(script_dir, "test_data.txt") print("Data path:", data_path) # Load numerical data from the file using numpy data = np.loadtxt(data_path) col2 = data[:, 1] # Calculate and output summary statistics for the second column of data print("Mean:", np.mean(col2)) print("Median:", np.median(col2)) print("Std:", np.std(col2))
Run the code to see the results.
Analysis#
NumPy can do a lot of the heavy lifting of importing raw data files into a format we can use. There is a fair bit going on here, so let’s break it down.
Import dependencies: As usual, we need to import the packages/libraries we are interested in using. Since we will be dealing with some operating system (OS)-specific file paths, we will use the
osbuilt-in module to make our life easier.Determine full data file path: Before we can read in our data file, we will need the complete file path (from the root of our file system). Since Windows and MacOS/Linux use different file path naming schemes, we use the helper functions in
os.pathwhich automatically determines the correct scheme to use. Let’s take a closer look at the lines dealing with this.script_path = os.path.abspath(__file__) script_dir = os.path.dirname(script_path) data_path = os.path.join(script_dir, "test_data.txt")
First, we convert the special
__file__variable (which is equal to the path of the currently running Python file) into the full (absolute) path usingos.path.abspath().We cannot be sure
__file__is not a relative path, so it is best practice to do this extra little step.
Next, we determine the path of just the folder the script file is in using
os.path.dirname().This is because we know our
test_data.txtfile is in this very same folder!We could do this manually by looking for the last
/or\in the string… but this would then also need to check for the OS. Hopefully you can see how theosmodule can be incredibly helpful here.
Finally, we can use
os.path.join()to join together the folder path with the data file name.Feel free to use
print()to see what each step is doing in more detail. If you are able, have a look at how someone else’s output looks here - you will see that the format of the paths is very different depending on the OS they are using.
Loading data: Thankfully, the next step is very simple as we can use the
numpy.loadtxt()function to load the data file into an array for us in a single line (no manual looping!).You are encouraged to read the documentation/docstring for this function, as you can set useful parameters such as the
delimiterused to separate numbers into columns in the text file itself. NumPy will try to do a lot of this automatically for you, but sometimes it might need a bit of help.If you are wondering why you can’t just use
numpy.loadtxt("test_data.txt"), go ahead and try it. The NumPy code will be stored somewhere else on your computer, and it will not have the data file in the same folder as itself.
Analyzing data: Now that we have loaded the data into our script, we can analyze it in any way we see fit.
In this example, the data we are interested is in the second column. Often when collecting data using an instrument, the first column of data is your independent variable (e.g., time) and the second column is your dependent variable (e.g., voltage).
By using
data[:, 1]we are selecting every row, but just the second column (remember Python indexing starts at 0).The rest is just using some of the NumPy functions that we have already seen.
Programming Challenge
See if you can write a program that can run a similar analysis on any number data files put in the data folder inside this topic’s workspace (should contain 001.txt and 002.txt).
Once you have this working, try to save a new file called output.txt which lists the analysis for each file, with each line (row) in the file being formatted as filename,mean,std.
Task 4#
In this task, we will be exploring one of the most powerful features of NumPy: vectorization. Essentially, rather than looping through an array and applying a function (e.g., an equation) to each element one-by-one, we can do this to an entire array at once, thanks to the underlying optimized NumPy code.
Create a new file called
numpy_vector.pyand paste the following:import numpy as np # Generate two random lists of integers list1 = np.random.randint(10, size=10) list2 = np.random.randint(10, size=10) # Use a loop to calculate the product of corresponding elements list_loop = [] for i in range(len(list1)): list_loop.append(list1[i] * list2[i]) print("Product list (loop):", list_loop) # Calculate the same using numpy vectorization list_numpy = list1 * list2 print("Product list (numpy):", list_numpy) print("Are the two lists equal?", np.array_equal(list_loop, list_numpy))
Read the code you just pasted and see if you can identify how NumPy is helping us write “better” code.
Run the code and compare the results.
Analysis#
Generating random integer arrays: We are using the
np.randommodule to generate two “lists” (technicallynumpy.ndarrays) containing 10 random integers (size=10) between 0 and 9 (inclusive).Have a look at the documentation to learn more.
Looping to multiply elements: Up until now, we might have been inclined to loop through an array and multiply each corresponding element together.
We use
range()to make sure we are going through all elements in the array (len(list1)), no matter its size.Append the product of the elements at position
iin the lists to a newlist_loop, which will contain our products.
Repeat using NumPy: Since we created
list1andlist2using NumPy, these are actually the specialnumpy.ndarrayobjects, and so we can use them as we have Python numbers (list1 * list2).Under the hood, NumPy is checking the arrays are the same size (1 row, 10 columns, each), multiplying the numbers at each position together, and outputting another
numpy.ndarrayof the same size with the results.This might not appear impressive with our simple 1-dimensional example, but imagine you had hundreds or thousands of rows that you did not have to think about looping through, while doing so very quickly.
Checking both methods: At the very end, we can use the
numpy.array_equal()function to check whether the two lists (“arrays”) are equal to each other.You might have noticed that by using
print(), the two lists do not quite output the same. However, when comparing the numbers contained within, they are indeed equal to one another.
This was a relatively straightforward example, with the real benefits of vectorization becoming apparent at larger scales.
Programming Challenge
See if you can do the same for a set of two 2D arrays, each with a size (3, 3), using standard Python loops followed by using NumPy vectorization.
Compare both results and verify they are indeed equal.
Part 2: Exploring SciPy#
In this part, we look at SciPy, a powerful library built on top of NumPy that provides additional tools for scientific computing. SciPy extends Python’s capabilities with modules for optimization, integration, interpolation, and more.
With SciPy, you gain access to robust algorithms that help solve complex mathematical and engineering problems quickly and efficiently.
Task 5#
SciPy’s integration routines make it easy to compute definite integrals. In this task, we will use the quad function from the scipy.integrate module to calculate the integral of the sine function over the interval [0, π].
Create a new file named
scipy_integration.py.Add the following code:
  import math

  from scipy.integrate import quad

  # Define the function to integrate
  def f(x):
      return math.sin(x)

  # Compute the integral of sin(x) from 0 to pi
  integral, error = quad(f, 0, math.pi)
  print(f"Integral of sin(x) from 0 to pi: {integral}")
  print(f"Estimated error: {error}")
  print(f"Estimated error: {error}")
Run the script and compare the result with the expected value of 2.
Analysis#
Importing modules: Even though SciPy uses NumPy, we don’t need to import it. It will be imported by SciPy itself.
However, we import
quad()for integration andmathfor the constant \(\pi\) and formath.sin().If you are wondering why
quad()is the name of the function, the method of “numerical integration” is often called “numerical quadrature” (simply “quadrature”).
Defining the function: The
quad()function requires a function as its input, which it will then integrate between the limits we have set.The
f()function we created simply returns the sine of its input, \(f(x)=\sin x\).There are more efficient ways of writing this using lambda expressions, but that is well beyond the scope of this module.
Computing the integral: The
quad()function computes both the integral and an estimate of the numerical error.Mathematically, we are solving this integral:
\[ \int_0^\pi \sin x\,dx\]If you look at the documentation for
quad(), you will see that it outputs a tuple in the form(integral, error). By writingintegral, error =, we are creating two variables on a single line, taking the corresponding value from the output tuple. Feel free to output to a single variable instead, and print that instead.
Output: We actually get 2 outputs from our integration.
integralis the value of the integration between the limits of 0 and \(\pi\).erroris actually the error in this value as determined by the numerical method used. In this case, the error is so small that it is essentially 0.
Task 6#
SciPy offers optimization routines that can help find the minimum or maximum of functions. In this example, we use the minimize() function from the scipy.optimize module to find the minimum of a simple quadratic function.
Create a new file called
scipy_optimization.py.Add the following code:
from scipy.optimize import minimize

# Define a quadratic function
def f(x):
    return (x - 3) ** 2 + 4

# Initial guess for the minimum
initial_guess = 0

# Find the minimum of the function
result = minimize(f, initial_guess)
print(result)
print("Minimum value found at x =", result.x[0])
Run the file to see if SciPy finds the minimum value of the function (can you work out what it should be?).
Analysis#
Defining the function: We define a quadratic function that we will be determining the minimum for.
Mathematically, this function is equivalent to the function \(f(x)=(x-3)^2+4\).
Note that
x ** 2is equivalent to \(x^2\), in other words we use**to raise to a power.We choose this function since quadratics have a single minimum (or maximum), and we can see at a glance that the minimum value will be at \(x=3\)
Optimization process: To find the minimum of the function, the
minimize()function from thescipy.optimizemodule is used.The
minimize()function uses iteration (looping) of possible \(x\)-values to find a minimum.Starting from the given
initial_guess, the algorithm evaluates the function, computes necessary derivatives, and adjusts \(x\) step by step.This process continues until it converges on the value of \(x\) that minimizes the quadratic function.
Output: The output of the
minimize()function is a special “result” object that contains detailed information about the optimization process:The
result.xattribute, which provides the x-value(s) that minimize the function. This is the one we care about right now.Additional information like convergence status, number of iterations, and function evaluations, which can help in understanding the performance of the optimization process.
For this specific functional form, the output will indicate that the minimum value is found at \(x \approx 3\).
Summary#
By the end of this section, you will have:
Learned the purpose of libraries and how they extend Python’s core functionality.
Seen how NumPy can streamline array operations and handle data analysis tasks more efficiently.
Discovered how SciPy builds on NumPy for scientific computing, offering useful tools for common tasks such as integration and optimization/minimization functions.
Gained practical experience with vectorization to avoid manual loops and speed up calculations.