
Appendix 3b: GitHub Copilot in VS Code#
Danger
Never run code or programs suggested by AI models without carefully reviewing them first. Failure to do so may lead to breakage of your system, data loss, or security vulnerabilities.
You have been warned.
This appendix provides instructions on how to set up and use GitHub Copilot within Visual Studio Code (VS Code) to assist with coding tasks. Some of the detail here has been adapted from the official VSCode GitHub Copilot documentation, but it may have been simplified or modified for the purposes of this course.
GitHub Copilot is an AI-powered code completion tool that suggests code snippets and entire functions based on the context of your code. As it is integrated directly into VS Code, it allows for a seamless coding experience.
Its main features include:
Code Suggestions: As you type, Copilot suggests code completions based on the context of your code.
Code Generation: You can ask Copilot to generate code snippets or entire functions based on natural language prompts.
Code Explanations: You can request explanations for specific code snippets to better understand their functionality.
Smart Actions: Copilot can help with refactoring (re-writing code to be more efficient or readable), adding comments, and more.
Important
You will need a free GitHub account to use GitHub Copilot, and there are multiple paid plans available for extended use. There is no expectation or requirement for you to pay for GitHub Copilot to complete this course, as the GitHub Copilot Free plan is quite generous, but you will need to think about how to use it effectively.
While you are a student, you may also be eligible for the GitHub Student Developer Pack, which includes additional access to GitHub Copilot for the duration of your studies. We will not be providing support on how to apply for this, but you can find more information on the GitHub Education website.
More details on the limits of the Free plan can be found in GitHub’s Copilot documentation.
Setting Up GitHub Copilot in VS Code#
Note
This section assumes you have already installed VS Code on your computer. If you haven’t, please follow the instructions in Topic 13 (IDEs and Debugging) to install it first.
As steps below may change over time, please refer to the official VSCode GitHub Copilot documentation for the most up-to-date information.
Follow these steps to set up GitHub Copilot in VS Code:
Hover over the Copilot icon () on the status bar in VS Code (usually bottom-right) and click on it.
Select “Use AI Features” from the menu that appears.
Sign in or create a GitHub account when prompted, and you should be automatically subscribed to the GitHub Copilot Free plan.
That should be it! You can now start using GitHub Copilot in your coding projects within VS Code.
Warning
Every instance of using these AI features will send your code and prompts to GitHub’s servers for processing. This will use up your GitHub Copilot usage limits mentioned earlier, and may have privacy implications depending on the nature of your code.
Please make sure you have carefully considered each time you use these features, as you may run out of free usage earlier than expected. You should also be mindful to avoid sending anything sensitive (e.g., passwords, personal data, proprietary information) to external services.
Note
Keyboard shortcuts mentioned below may vary based on your operating system and VS Code configuration, please refer to the Github Copilot in VSCode Cheat Sheet for more details on these, as well as other features.
GitHub Copilot Inline Features#
Let’s take a look at some of the ways you can use GitHub Copilot to assist with your coding tasks in VS Code, without needing to leave the editor. We refer to this as using Copilot “inline”, as opposed to using a separate chat interface.
Inline Code Suggestions#
As you type code, GitHub Copilot will provide inline suggestions directly in the editor.
To accept a suggestion, simply press Tab.
Let’s take a look at an example:
Open a new Python file in VS Code, and start typing a list of elements:
elements = ['Carbon', 'Hydrogen', 'Nitrogen', 'Oxygen']
After typing the above line, start typing a
forloop to iterate over the elements, and you should see Copilot suggesting the rest of the loop in “ghost text” (text in a faint color):
In the image above, Copilot suggests the complete
forloop to print each element in the list along with its atomic number. You can ignore the error highlighting for now; it will disappear once the code is complete (it is indicating that the manually written code,for, is incomplete).Sometimes, you can get multiple suggestions for a code snippet. To see these, press
Alt+[orAlt+](orOption+[/Option+]on Mac) to cycle through the suggestions.If you are happy with the suggestion, press
Tabto accept it.
Important
Can you spot any issues with the suggested code in the image in step 2 above?
Hint: What are the atomic numbers of the elements in the list? Would the code give the right answers?
AI tools like GitHub Copilot can be incredibly helpful, but they are not infallible. Always review and test the code suggestions to ensure they are correct and appropriate for your specific use case.
Generating Code#
You can also ask GitHub Copilot to generate code snippets or entire functions based on natural language prompts.
In your Python file, go to a new line and press
Ctrl+I(orCmd+Ion Mac) to open the inline Copilot chat interface.Type a prompt asking Copilot to generate some code and press
Enter, for example:Function to calculate the number of moles given mass and molar mass.
Copilot will generate a code snippet based on your prompt.
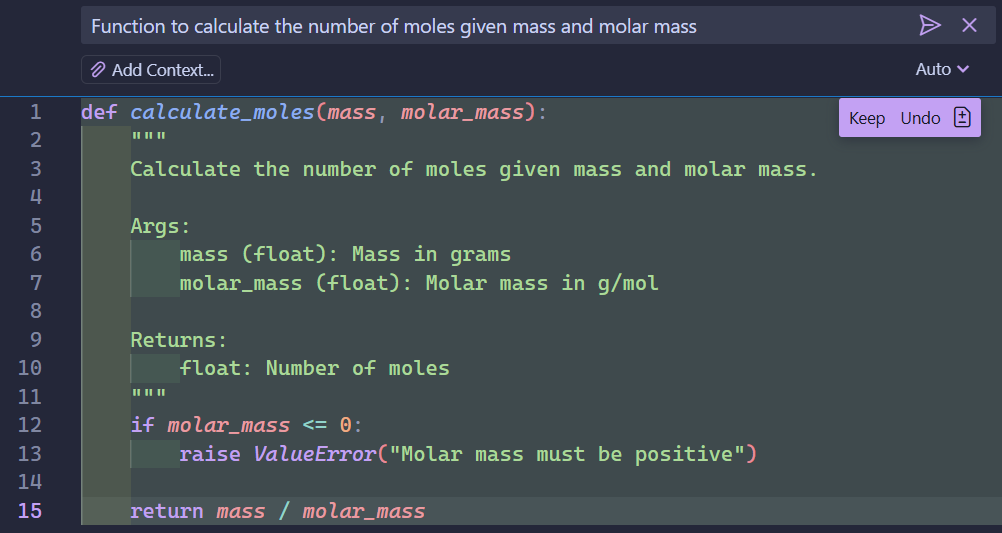
You can review the generated code (green highlight) and accept it by pressing
Ctrl+Enter, or modify it as needed. In this case, Copilot generated a function that calculates the number of moles based on the provided mass and molar mass, and does some error checking on themolar_massparameter. It also includes a docstring to explain the function’s purpose and parameters.
Note
Can you identify any potential improvements you could make to the generated function above?
Hint: Should the function only check if the molar mass is negative, or are there other invalid values to consider?
Generated code may not always be perfect (or correct!) or follow good practice.
Modifying Existing Code#
Similarly to generating new code, you can ask Copilot to modify existing code snippets.
Highlight a block of code in your Python file that you want to modify, then press
Ctrl+I(orCmd+Ion Mac) to open the inline Copilot chat interface.Type a prompt asking Copilot to modify the code and press
Enter, for example: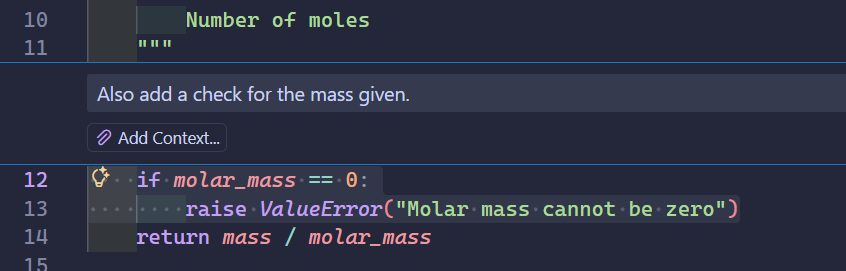
In the image above, we asked Copilot to add error handling for mass values.
Copilot will generate a modified version of the code based on your prompt, which you can review and accept or modify further.
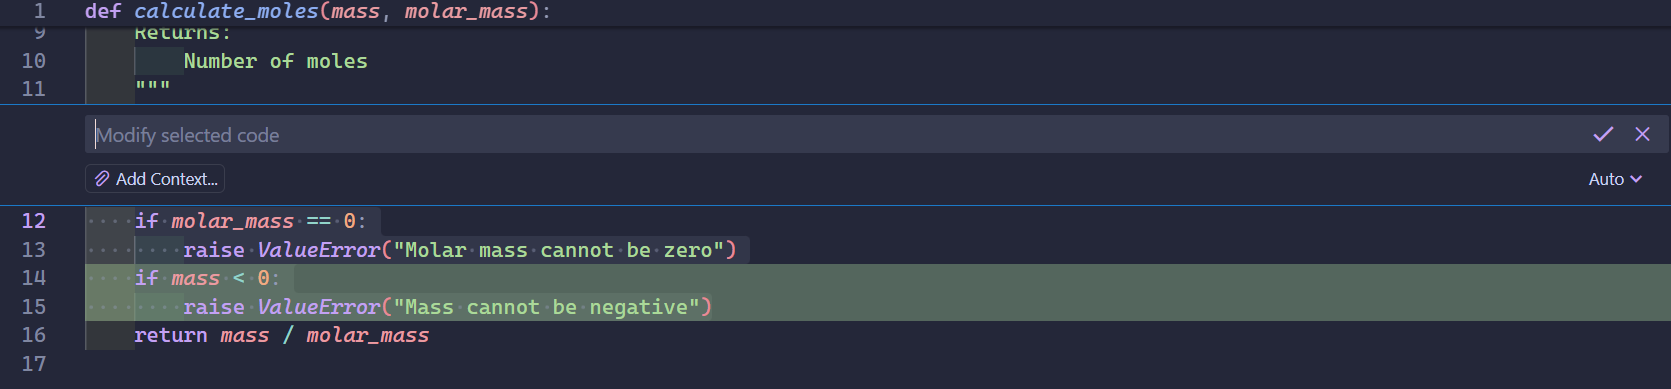
In some cases, Copilot may delete or replace parts of the original code if it deems them unnecessary or improvable. This will be indicated by red highlighting in the generated output, either for entire lines or specific parts of lines.
Copilot Chat#
VS Code also includes a dedicated Copilot Chat interface, which allows for more interactive conversations with AI.
This can be useful for more complex coding tasks or when you want to have a back-and-forth discussion about your code.
To open the Copilot Chat interface, press Ctrl + Shift + I (or Cmd + Shift + I on Mac).
Different Chat Agents
VS Code’s Copilot Chat interface allows you to select different AI “agents” for your conversations. These agents are optimized for different tasks, such as coding, writing, or general assistance; think of them as a different persona tailored to specific needs.
You can select the agent from the dropdown menu at the bottom of the Copilot Chat interface, where you can select from the following:
Agent: Opptimized for complex coding tasks based on high-level requirements that might require running terminal commands and tools.
This can allow the AI to operate autonomously, determining the relevant context and files to edit, planning the work needed, and iterating to resolve issues as they arise. Use with caution.
Plan: Optimized for creating a structured implementation plan for a coding task.
Use the plan agent when you want to break down a complex feature or change into smaller, manageable steps before implementation.
Ask: Optimized for answering questions about your codebase, coding, and general technology concepts.
Use Ask when you want to understand how something works, explore ideas, or get help with coding tasks.
Edit: Optimized for making code edits across multiple files in your project.
Edit is useful for coding tasks when you have a good understanding of the changes that you want to make and which files you want to edit.
Danger
Depending on the agent you select, they may ask to run external programs or scripts on your computer. Never allow this unless you are absolutely sure it is safe to do so!
You are responsible for any actions taken on your computer, so always review and understand what is being run before allowing it.
Chat Sessions#
When you start a chat in Copilot Chat, it retains the context of your previous messages within that session. This allows for more coherent and context-aware conversations, as Copilot can refer back to earlier parts of the discussion.
If you’re working on a new topic or task, it’s often a good idea to start a fresh session. This ensures that the AI focuses solely on the current context, avoiding any potential confusion from previous discussions that might not be relevant.
Start a new chat session#
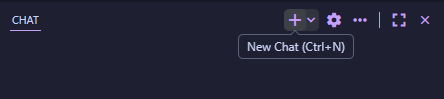
Click the “New Chat” button at the top of the Copilot Chat interface.
This will clear the current conversation and start a fresh session.
Resume a previous chat session#
This applies to sessions in the current VS Code workspace/folder only.
Click the “New Chat” button again.
Select the desired session from the list of “Recent Sessions”.
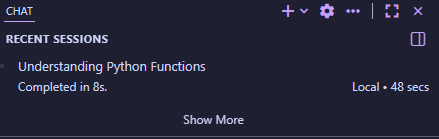
This will load the selected session, allowing you to continue the conversation from where you left off.
If you instead want to find a specific past session, click on “Show More” and use the interface to filter or search for the session you are looking for.
Warning
Session history should persist between VS Code restarts, but it is a good idea to periodically back up any important information from your chat sessions, as there is always a risk of data loss or corruption.
Context#
Depending on the information provided to Copilot, it can provide more relevant and accurate responses from the AI model. When using Copilot Chat, you can specify the context you want it to consider when generating responses.
This might not be something to worry about if you are working within a smaller file. However, for larger projects, e.g., when working across multiple files, it can help Copilot provide more accurate and relevant responses.
The context included in a prompt is always shown above the prompt input box, so you can see what information Copilot is using to generate its response.This can include:
The current file you are working on
Other files in the current workspace/project
Specific lines of code you highlight in the editor
External documentation or resources you provide
The image above shows an example of Copilot Chat using context from the current file (phar2062.py, lines 1-9 selected) to explain a code snippet.
Implicit Context
By default, Copilot Chat will automatically include some context, including:
The currently selected text in the active editor.
The file name or notebook name of the active editor.
If you’re using Ask or Edit, the active file is automatically included as context.
When using agents, the agent decides autonomously if the active file needs to be added to the chat context based on your prompt.
Adding Context#
When you type a prompt in Copilot Chat, you can add context by using special tags (#-prefixed) in your prompt.
File Context#
You can specify particular files or folders to include as context by doing one of the following:
#-mention the file or folder, by typing
#followed by the name of the item you are looking for. A popup should allow you to select the desired file or folder from a list.Drag and drop files or folders from the Explorer view into the prompt input box.
Select “Add Context” (the paperclip icon) above the prompt input box, then choose the desired files or folders from the dialog that appears.
Workspace Context#
If you would rather Copilot search through your workspace files to find relevant context, you can use the #codebase tag in your prompt.
Depending on which agent you are using, this may be added automatically for you if it decides it needs it.
Below are some example prompts that use the #codebase tag:
Explain how the number of moles is calculated in #codebaseWhere is the function to find the molar mass of a compound? #codebaseAdd a function to estimate the boiling point of a compound based on its structure. #codebase
External Context#
At times, you may want to ask Copilot Chat to refer to an external resource, such as a webpage or document. This is particularly useful if you want to implement functionality based on the documentation of a specific library.
To do this, use the #fetch tag followed by the URL of the resource you want to include as context.
For example, you may wish to tweak the legend of a plot generated by Matplotlib. You can provide the Matplotlib documentation page for legends as context by using the following prompt:
Add a legend to the plot with a red background and bold text. Center it in the middle of the figure. #fetch https://matplotlib.org/stable/api/_as_gen/matplotlib.pyplot.legend.html
You may require confirmation to allow Copilot to fetch the content from the provided URL.
Note
The output of Copilot can only be as good as the prompt and context you provide, but this is not a guarantee of correctness. In the above example, the prompt is asking for a terribly styled legend for a figure.
As a reminder, even if your prompt is well-constructed, always review and test the generated code as it may contain errors or not work as expected.
Explaining Code#
It can be helpful to better understand code snippets by asking Copilot to explain them.
Copy the following code snippet into your Python file (from an earlier topic):
 initial_amount = 100  # grams
 decay_rate = 0.1      # 10% decay per time unit
 time_steps = 5

 amount = initial_amount
 for t in range(time_steps):
     amount = amount * (1 - decay_rate)
     print(f"After {t+1} time unit(s), amount remaining: {amount} grams")
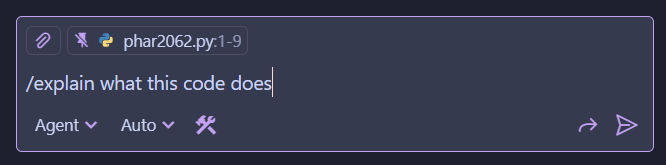
Highlight all the lines of code, then open the Copilot Chat interface by pressing
Ctrl+Shift+I(orCmd+Shift+Ion Mac).Type a prompt asking Copilot to explain the code, using
/explainat the start of your prompt:
Notice that above the prompt text itself, the current context is shown (in my case it is file
phar2062.py, lines 1-9), which helps Copilot understand what code you are referring to. If you do not select the code in the editor first, Copilot will use the entire file as context instead!If you want to change which model is used, you can select it from the dropdown menu below the prompt input box, but normally
Autois fine. Different models will cost different amounts of your limited “requests” (between 0-3x), so be mindful of this as you will run out more quickly depending on the model chosen.Press
Enterto submit your prompt, and Copilot will generate an explanation of the highlighted code.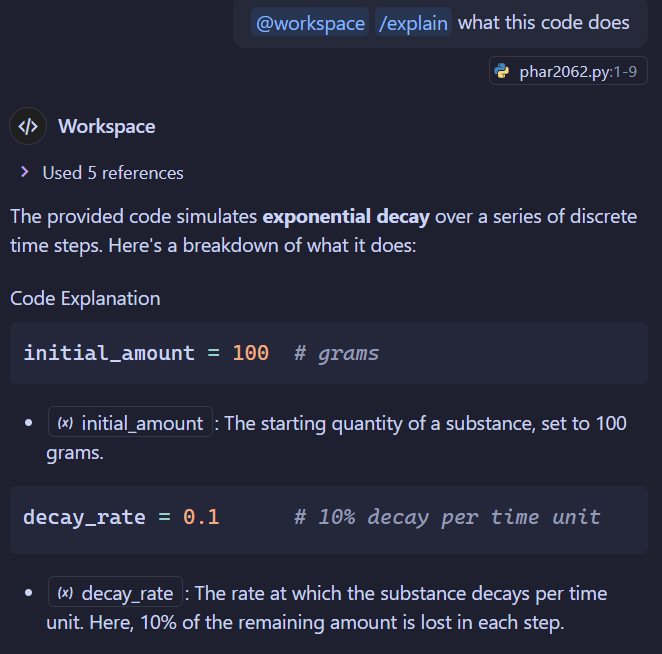
In the image above (cut for brevity), Copilot provided a detailed explanation of what the code does, including the purpose of each variable and the overall functionality of the loop.
You might notice that the prompt above includes a
@workspacetag, which indicates that Copilot has “invited” a special chat agent to participate, one which is optimized in answering questions about your workspace or code. It might suggest this tag automatically based on the code you selected or the nature of your prompt; you can read more about it here.Note
Your results will look different as they are generated by an AI model each time.
Additional Resources#
Below are some additional resources to help you get the most out of GitHub Copilot in VS Code:
GitHub Copilot in VS Code Documentation: Official documentation for using GitHub Copilot in VS Code. The Tips and Tricks section is particularly useful, and you should definitely check it out.
Awesome Copilot: A community curated list of resources, tools, and examples for using GitHub Copilot effectively.